
Add a personal touch to your holiday decor with this step-by-step DIY painted nutcracker guide! Learn how to create custom designs, find display tips, and explore unique styling ideas to make your nutcracker the star of Christmas.
Few decorations capture the magic of the holidays like a beautifully crafted nutcracker. While traditional red and green versions are festive staples, a painted nutcracker offers a chance to reimagine this classic with your own creative twist.
Match it to your holiday color palette, explore unexpected tones, or add whimsical details—custom-painted nutcrackers become eye-catching centerpieces full of personality. This simple yet rewarding DIY is perfect for seasoned crafters and curious beginners alike.
Why Paint Your Nutcracker?
A hand-painted nutcracker breathes new life into a classic holiday figure, allowing you to tailor it to your unique decor style. Here’s why this DIY is worth adding to your holiday lineup:
- Endless Color Options: Choose anything from soft pastels and bold jewel tones to black-and-white minimalism to match your aesthetic.
- Budget-Friendly: Transform old or unfinished nutcrackers into showpieces without spending a fortune.
- One-of-a-Kind Decor: Unlike store-bought items, your creation will stand out as a custom, handmade treasure.
- Meaningful Gift: Painted nutcrackers are heartfelt, personal, and perfect for gifting to friends or family during the holidays.
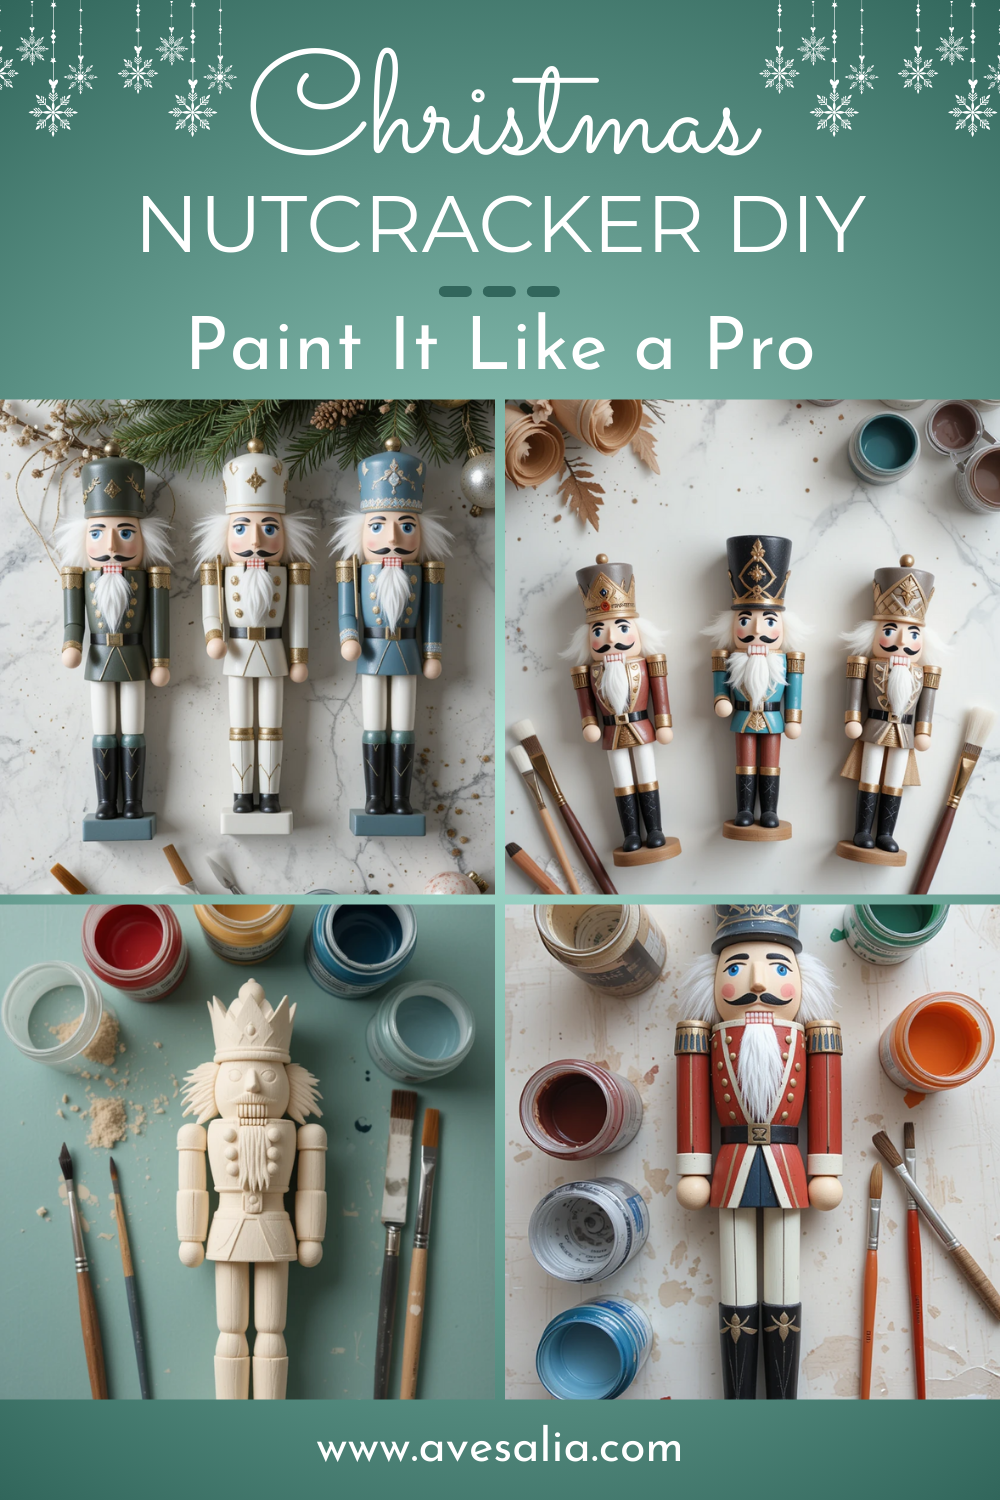
Step-by-Step Guide to Painting Your Nutcracker
Turn a blank nutcracker into a festive masterpiece with just a few supplies and a little creativity. This step-by-step guide walks you through surface prep, painting techniques, detailing, and sealing to ensure a polished final result.
Materials You’ll Need
Here’s everything you need to transform a simple nutcracker into a personalized holiday centerpiece:
| Item | Product | Description |
| Nutcracker Figure | Unfinished Wooden Nutcracker | A blank wooden figure ready for paint. |
| Acrylic Paint Set | Premium Acrylic Paint Set | Smooth, vibrant paints for your design. |
| Fine Paint Brushes | Detail Paint Brush Set | Perfect for precision and intricate details. |
| Painter’s Tape | Blue Painter’s Tape | Ensures clean edges between colors. |
| Sealer or Varnish | Matte Spray Sealer | Protects the paint and adds a polished finish. |
How to Paint Your Nutcracker
Step 1: Prepare the Surface: Start with a clean, smooth nutcracker. If the surface has any rough areas, lightly sand it with fine-grit sandpaper. Wipe off any dust with a cloth, and if you’re painting over dark colors, apply a coat of white primer to ensure your chosen colors pop.
Step 2: Plan Your Design: Sketch out your color palette and decide on patterns. Painter’s tape helps mark off clean lines between sections like the hat, coat, and boots. Whether you opt for bold teal and gold or soft vintage shades, having a plan will make the process easier.
Step 3: Paint the Base Layers: Focus on larger areas first, such as the hat, coat, and pants. Use smooth, even strokes and apply thin layers of acrylic paint, letting each coat dry fully before adding another. This prevents smudges and streaks.
Step 4: Add Fine Details: Once the base is dry, move on to the finer details:
- Use metallic gold or silver paint for buttons, belts, and accessories.
- Carefully paint facial features—eyes, mustache, and rosy cheeks—for character.
- Add small patterns, stripes, or glitter accents for a whimsical flair.
Take your time with detail work, using fine paintbrushes to ensure precision.
Step 5: Seal and Finish: When the paint has completely dried, spray the nutcracker with a matte or glossy sealer to protect your work. This step adds durability and a polished, professional look. Allow it to fully dry before displaying.
Creative Nutcracker Painting Styles to Spark Your Holiday Imagination
Elevate your painted nutcracker with these unique themes that blend festive charm with bold creativity. Whether you’re aiming for a cosmic vibe or a cozy, heartwarming look, these styles will inspire you to craft a standout holiday centerpiece:
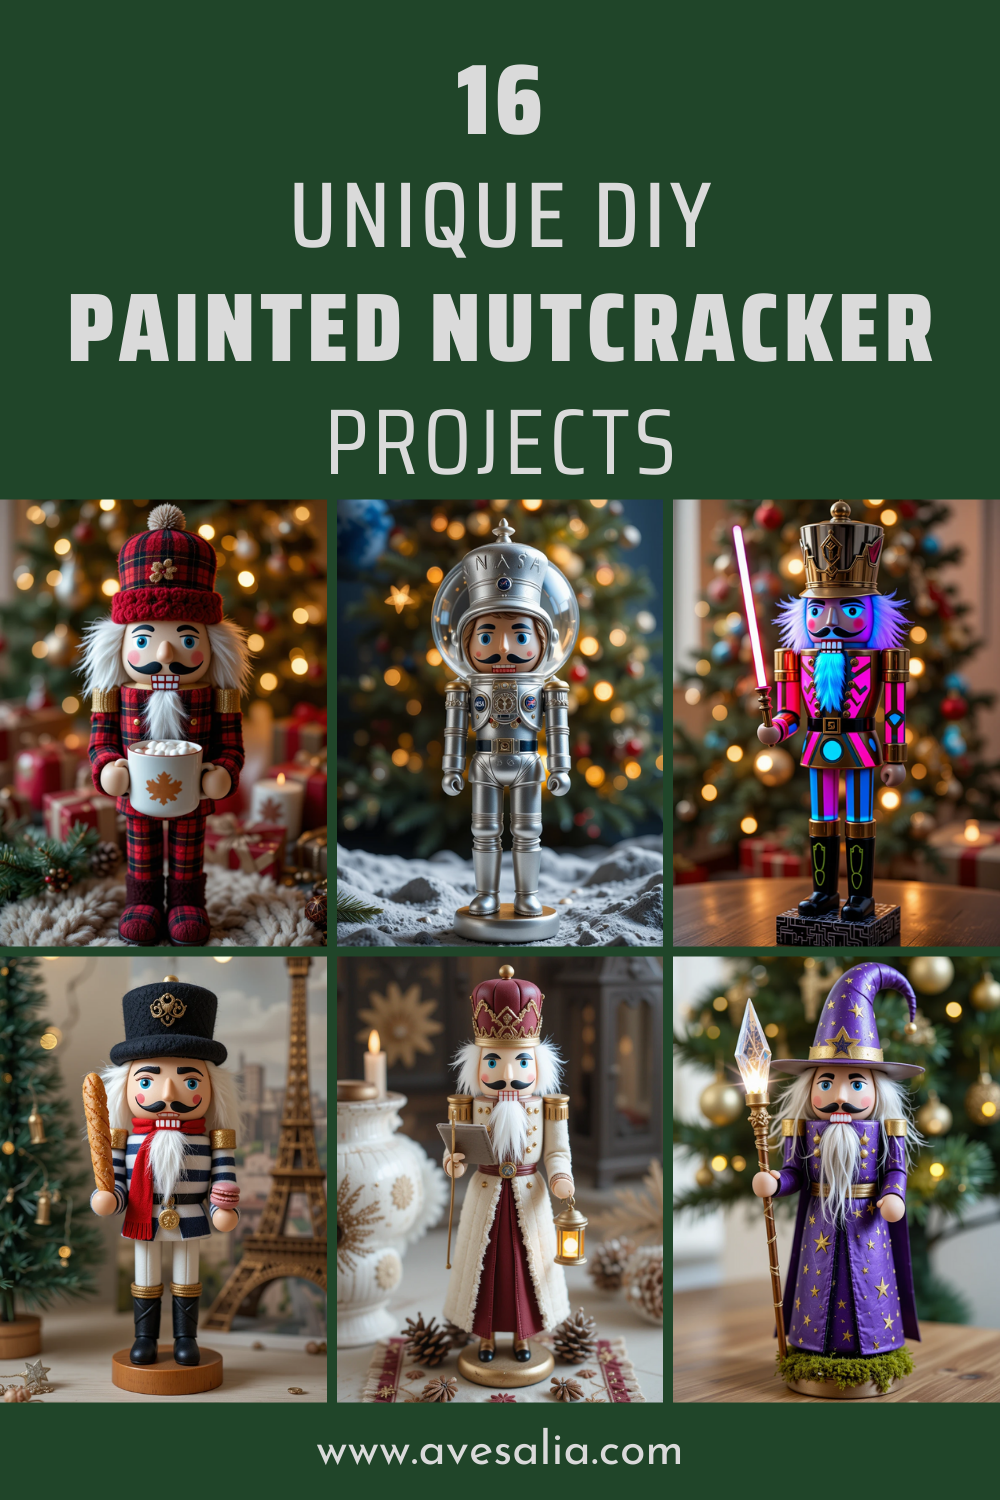
- Galactic Glow: Transform your nutcracker into a celestial wonder with deep blues, purples, and shimmering star accents. Add metallic silver for a helmet or LED lights at the base for a nebula-like glow, perfect for a space-themed holiday display.
- Whimsical Wizardry: Embrace enchantment with a wizard-inspired nutcracker, featuring a star-studded robe, a flowing beard, and a glowing staff. Soft purples and golds paired with mossy base accents create a magical, fairytale vibe.
- Frosted Elegance: Capture winter’s icy beauty with cool blues, frosty whites, and snowflake details. Add faux fur or crystal embellishments for a snow queen-inspired look that sparkles in any holiday setting.
- Cozy Comfort: Give your nutcracker a heartwarming twist with flannel pajamas, a tiny book, or a lantern for a fireside storyteller aesthetic. Soft creams and burgundies with quilted fabric accents evoke warmth and nostalgia.
- Vintage Voyager: Reimagine your nutcracker as a retro explorer with sepia tones, leather-like textures, and antique map details. Add a tiny compass or telescope crafted from clay for an adventurous, old-world charm.
- Candy-Coated Cheer: Infuse playful sweetness with vibrant red-and-white peppermint stripes and glittery candy accents. Use polymer clay to create mini lollipops or a candy cane staff, perfect for a whimsical, dessert-inspired holiday vibe.
✨ Looking for more inspiration? Check out our guide, discover 16 Creative Painted Nutcracker DIY Ideas for Stunning Christmas Decor, for a collection of imaginative themes, from galaxy-inspired designs to cozy fireside motifs, complete with tips to bring your vision to life.
Where to Display Your Painted Nutcracker
Your hand-painted nutcracker is a work of art that deserves a prime spot in your holiday decor. Here are some creative and festive display ideas to make it shine:
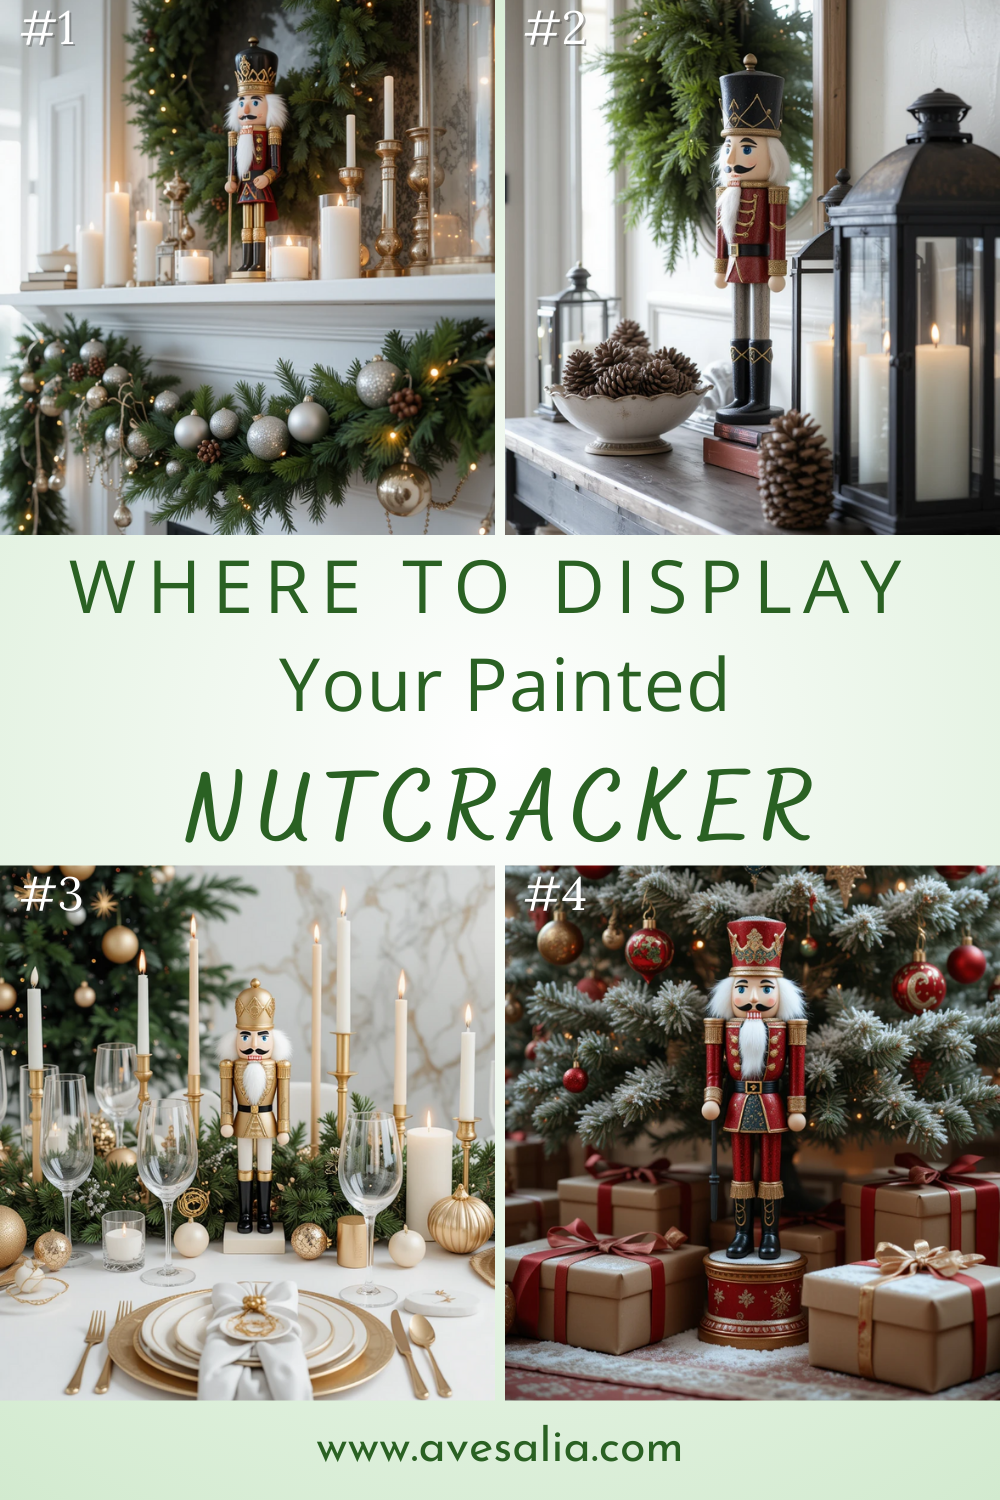
#1. Mantelpiece Magic
Transform your mantelpiece into a festive focal point by positioning the nutcracker alongside candles, garlands, and twinkling lights. The warm glow of the candles will complement the vibrant colors of the nutcracker, creating a cozy and inviting holiday vibe. Surround the nutcracker with evergreen garlands, silver or gold ornaments, and a few twinkling fairy lights to enhance the ambiance. This display will instantly evoke a sense of nostalgia and joy, welcoming family and friends into a holiday haven.
#2. Tree Companion
Place the nutcracker at the base of your Christmas tree to create a seamless, festive aesthetic. The nutcracker can act as the perfect companion to your tree’s ornaments, enhancing the overall theme of your decorations. Whether your tree is adorned in traditional red and green or a more modern color palette, the nutcracker will blend in beautifully, adding a touch of whimsy and nostalgia. A scattering of faux snow or small wrapped gifts around its base will further elevate this festive setup.
#3. Holiday Tablescape
Create a stunning holiday tablescape by using the nutcracker as a statement centerpiece. Surround it with lush greenery, sparkling ornaments, and candles in festive colors to create an eye-catching display. A mix of textures like velvet table runners, metallic chargers, and shimmering glassware will add depth to the setting. This table arrangement will make a bold statement, perfect for holiday dinners or gatherings, ensuring your guests are immersed in the holiday spirit from the moment they sit down.
#4. Entryway Welcome
Place the nutcracker near the front door or on an entry table to greet guests with festive cheer. As a first impression, the nutcracker will immediately set the tone for your home’s holiday atmosphere. Pair it with a festive wreath on the door, a few elegant seasonal touches like a bowl of pinecones or a holiday-themed runner, and perhaps even a lantern or two with flickering candles to add warmth. This thoughtful entryway display will ensure that your guests feel the holiday magic as soon as they step inside.
Tip: If you’ve painted multiple nutcrackers, group them together for a coordinated, charming holiday display.
A Modern Twist on a Timeless Classic
A painted nutcracker is the perfect blend of tradition and creativity, allowing you to express your personal holiday style. From bold modern hues to soft vintage charm, your creation will bring warmth, whimsy, and wonder to your seasonal decor.
This guide is designed to help you every step of the way—whether you’re crafting solo or making memories with family. Simple, affordable, and endlessly customizable, this DIY is sure to become one of your favorite holiday traditions.
I hope this guide helps you create something magical and meaningful this Christmas!


