
Discover how to create a magical DIY Star Christmas Wall Art Tree with twinkling lights and radiant touches. Perfect for small spaces, modern homes, and anyone looking for a chic, budget-friendly holiday decor idea
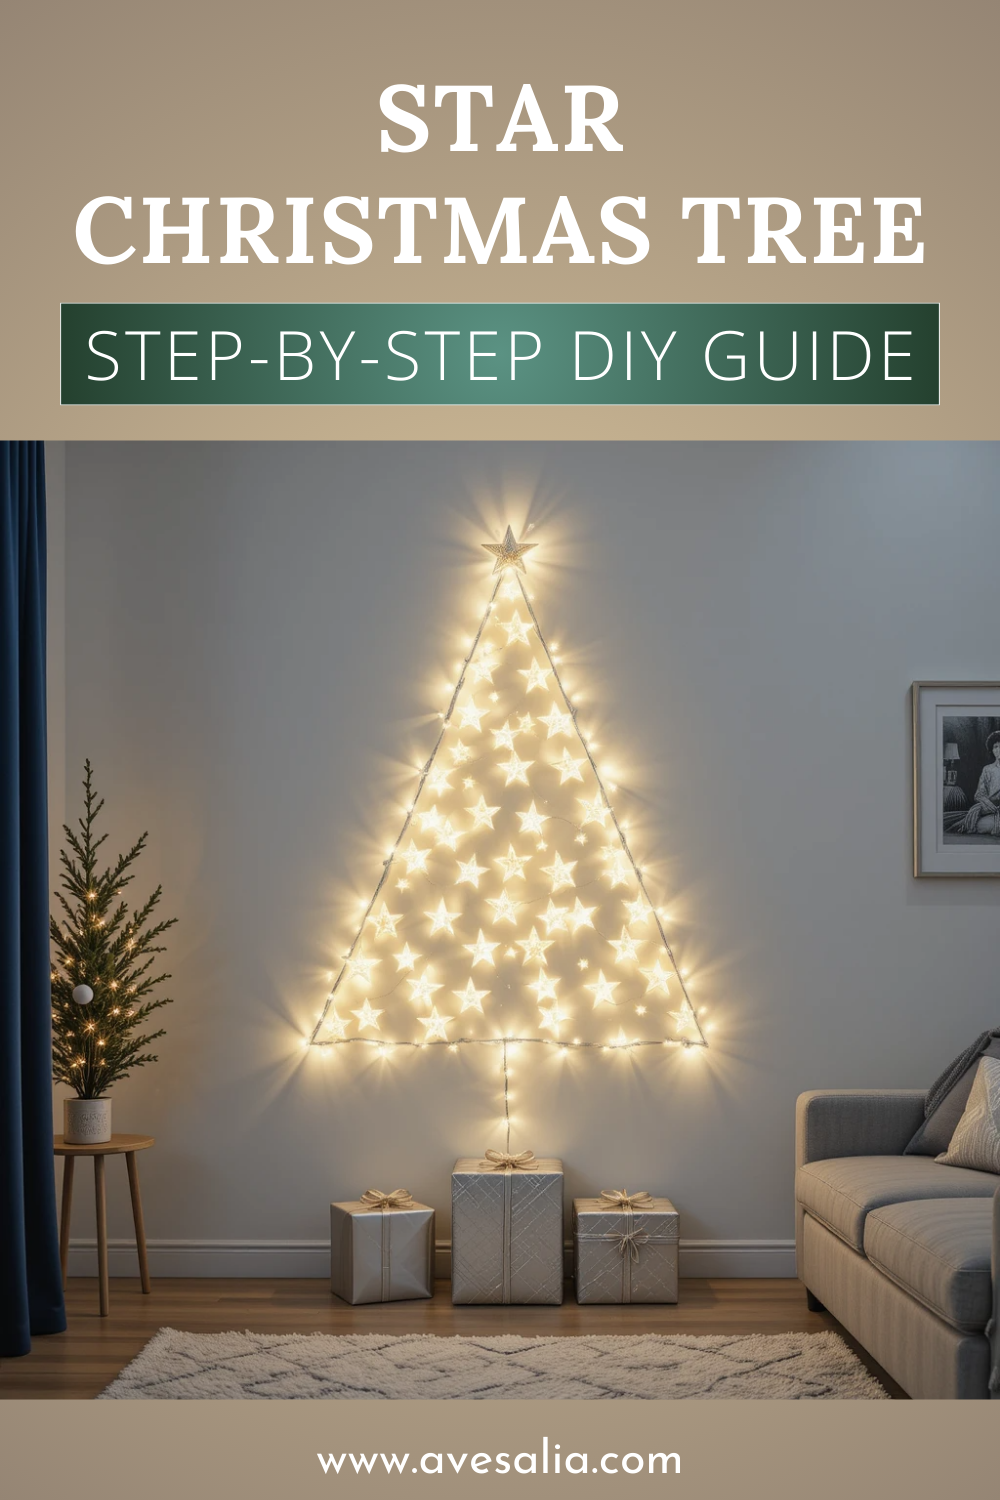
Bring a celestial twist to your holiday season with a stunning DIY Star Christmas Wall Art Tree. Perfect for those who love a touch of cosmic magic, this wall art design features glowing star-shaped lights—you can pick the size and shape of the stars, from tiny sparkles to bold, classic shapes—and a sleek silhouette that adds festive charm to any room.
This unique wall art tree is ideal for small apartments, cozy bedrooms, entryways, or even office spaces where a traditional tree might feel too bulky. With flexible placement and customizable touches, it’s a fun way to let your creativity shine.
It’s easy on the wallet, simple to put together, and a real conversation starter that’ll have guests marveling at its starry glow. All you need are LED star lights, some clear hooks, and a few wire strings to create a sparkling wall art centerpiece that captures the holiday spirit without taking over your space.

Why Choose a DIY Star Christmas Tree?
Opting for a DIY Star Christmas Tree offers standout benefits for modern holiday decorators. This glowing design adds festive charm while embracing creativity, sustainability, and space efficiency.
- Space-Saving Design for Any Home: Perfect for apartments, dorms, or compact spaces, this wall-mounted tree uses minimal floor space while delivering major visual impact. Its flat shape fits neatly against a wall, and you can scale the size to suit your room—from a small accent to a bold holiday centerpiece.
- Fully Customizable to Match Your Style: This wall art tree is your canvas. Choose star lights in warm, cool, or colorful tones, with star sizes and shapes (small, large, or mixed) to match your style. Add ribbons, moons, or metallic accents to fit modern, cosmic, or minimalist themes.
- Budget-Friendly and Sustainable: More affordable than a full-size tree, this DIY version uses simple materials like LED lights and wall hooks. Repurpose old decor or thrift unique finds, and reuse components each year for an eco-friendly, low-cost option.
- Eye-Catching Conversation Starter: With twinkling star lights and a clean outline, this wall art tree grabs attention. It’s a magical, celestial focal point that lights up holiday gatherings.
- Quick and Easy to Set Up: No heavy lifting or complex tools needed—this beginner-friendly project comes together in an afternoon. Simple steps make it a fun, low-stress activity for individuals or families.
How to Create Your Star Christmas Tree
Craft a magical Star Christmas Tree using glowing LED star lights, flexible wire strings, and clear wall hooks to form a festive tree shape on any wall. This minimalist design is ideal for modern interiors, small apartments, or anyone seeking a creative holiday statement. Easy to assemble and endlessly customizable, it brings a twinkling, cosmic charm that fits your space and style, adding holiday warmth with a starry twist.
Materials Needed:
Here’s a detailed list of materials to bring your Star Christmas Tree to life:
| LED Star Fairy String Lights | Battery-operated or plug-in star lights, with sizes and shapes (small, large, or varied) you choose for a twinkling, celestial glow. |
| Adhesive Wall Hooks | Non-damaging hooks for securing lights to walls, perfect for renters. |
| Flexible String Lights | Soft, bendable wire lights to outline the tree or fill gaps for extra sparkle. |
| Gold or Clear Decorative Tape | Optional for securing lights neatly or adding a metallic accent to the design. |
| Painter’s Tape | Used for sketching the tree’s outline without marking walls permanently. |
| Optional Ornaments | Lightweight moons, comets, or tiny bells to boost the festive vibe. |
| Craft Sticks or Elastic Twigs | Thin wooden sticks, flexible willow twigs, or elastic craft vines to mimic branches, trunk, or roots. |
When selecting materials, prioritize quality LED lights with adjustable brightness for the best effect. Battery-operated lights offer flexibility for placement without needing a nearby outlet, while plug-in options are ideal for larger designs. Consider the length of your light strings—10-20 feet is typically sufficient for a medium-sized tree, but measure your space to be sure.
For a cohesive look, match the light color (e.g., warm white for cozy vibes, cool white for modern elegance, or multicolor for festive fun) to your room’s aesthetic.
✨ Tip: You can repurpose fairy lights from previous holidays to keep costs down.
Steps to Build Your Tree:
Follow these detailed steps to create a stunning wall art tree that’s sure to impress. Each step is designed to be beginner-friendly, with pro tips to elevate your design and ensure a professional finish.
Step 1. Plan Your Tree Layout
Start by envisioning the shape and size of your tree. Using painter’s tape or a light pencil, sketch a Christmas tree outline directly on your wall or chosen surface. Aim for a classic triangular shape with a wide base that tapers to a point, mimicking a traditional tree, or experiment with asymmetrical curves for a modern twist. Measure your wall space to ensure the tree’s proportions suit the area—smaller spaces may call for a compact 3-4 foot design, while larger walls can handle a 6-8 foot tree.
Creative Variation: For a playful look, incorporate subtle waves or zigzags into the outline, or create a spiral tree for a 3D effect in open spaces.
✨ Pro Tip: Use a measuring tape to mark equal distances for the base and sides to maintain symmetry. Step back frequently to check the shape from different angles, or use a string to test the outline before committing to tape or pencil marks.
Step 2. Attach the Star Lights
With your outline in place, begin attaching the LED star fairy lights. Start at the base of the tree and work upward to create a natural flow. Secure the lights using clear adhesive command hooks or decorative tape, ensuring they follow the sketched outline. Let the star lights drape softly for a radiant, twinkling effect that adds depth to your wall art.
✨ Pro Tip: Space the stars evenly for a balanced look, or cluster them in certain areas to create focal points. Test the lights before securing them to ensure they work properly.
Safety Note: If using plug-in lights, ensure the cord is safely tucked away to avoid tripping hazards. For renters, command hooks are ideal as they remove cleanly without damaging walls.
Step 3. Fill in with Light Wire Strings
To enhance the glow and fill any sparse areas, use flexible light wire strings. Trace the outer edges of the tree to define its shape or weave the wires through the middle to add dimension. These subtle lights create a soft, ambient sparkle that complements the star lights. For a crowning touch, shape the wire strings into a big star, crescent moon or snowflake at the top of the tree.
Creative Idea: Play with wire patterns like crisscrosses for constellation vibes or loops for mini planets. Warm white wires pair nicely with silver star accents for a cozy cosmic glow.
✨ Pro Tip: Use small adhesive clips to secure wire strings in intricate patterns, ensuring they stay in place without disrupting the design.
Step 4. (Optional) Add Branch, Trunk, or Root Accents
For a creative twist, enhance your tree’s silhouette by adding elastic materials to suggest branches, a trunk, or roots without altering the minimalist light-based design. Use thin wooden craft sticks, flexible willow twigs, or elastic craft vines, secured with decorative tape or small command hooks along the wall.

Arrange sticks or twigs horizontally within the tree’s triangular outline to mimic branch-like textures, or place a single vertical stick at the base for a subtle trunk effect. For a whimsical root look, drape elastic vines at the bottom, curving outward. These additions are optional and can be painted or wrapped with fairy lights to blend seamlessly with the design.
✨ Pro Tip: Keep accents sparse to maintain the minimalist aesthetic; 3–5 sticks or twigs are sufficient for a medium-sized tree. Spray-paint them gold or white for a festive touch.
Creative Variation: Wrap elastic vines with battery-operated micro LED lights for extra sparkle, or use bendable wire branches for a sculptural effect.
Step 5. Final Touches
Step back to admire your Christmas Tree from various angles. Check for balance in the light distribution, star spacing, and overall shape. Make minor adjustments by repositioning hooks or tweaking the light placement. Add personal touches like lightweight moons, comets, or bells for a festive touch. For a dramatic effect, dim the room’s lights to see the full glow of your creation.
Creative Variation: Incorporate metallic garlands or tinsel along the edges for extra sparkle, or hang a few crystal beads to catch the light and add elegance.
✨ Final Tip: Consider adding a dimmer switch to your LED lights for adjustable brightness, allowing you to create a soft ambiance or a vibrant holiday glow depending on the mood.
Where to Place Your DIY Christmas Tree
The versatility of the this type of Christmas Tree makes it a perfect addition to various spaces, transforming any area into a festive haven. Here are some ideal locations to display your glowing creation:

Feature Wall in the Living Room: Turn a blank wall into a stunning holiday centerpiece. The twinkling stars create a captivating focal point, perfect for holiday gatherings or cozy nights in. Place it above a console table with wrapped gifts or candles to complete the look.
Bedroom for a Cozy Glow: Add a touch of holiday magic to your bedroom with this delicate tree. The soft starlight creates a serene, festive ambiance, ideal for winding down during the holiday season. Position it above your headboard or on a side wall for a dreamy effect.
Entryway for a Welcoming Vibe: Greet guests with a unique holiday display in your entryway. The glowing tree makes a memorable first impression, setting a festive tone as visitors arrive. Pair it with a small table displaying holiday cards or a scented candle for added warmth.
Office or Workspace for Subtle Cheer: Bring holiday spirit to your workplace without overwhelming the professional setting. This minimalist tree fits perfectly on an office wall or cubicle partition, adding elegance without cluttering the space.
Dining Area for Festive Meals: Elevate your dining room with a glowing star tree as a backdrop for holiday dinners. Its soft glow enhances the ambiance, making meals feel special. Place it on a wall near the dining table for maximum impact.
Outdoor Patio or Balcony: If using weatherproof LED lights, create an outdoor version of the tree on a balcony wall or exterior surface. This adds festive charm to your outdoor space, perfect for holiday parties or cozy evenings under the stars.
Retail or Storefront Display: For small business owners, this tree is a budget-friendly way to create an eye-catching holiday display in a shop window or store interior, attracting customers with its unique design.
Children’s Room for a Magical Touch: Delight kids with a star tree in their bedroom or playroom. Use colorful star lights or add playful ornaments (add comets and moons for fun) to make it kid-friendly and fun, sparking their holiday excitement. In my son’s room, we swapped stars for comets and galaxies. He absolutely loves it—and now it’s become a year-round cosmic tree!

✨ Pro Tip: Consider the wall color and surrounding decor when choosing a location. Neutral walls (white, beige, or light gray) allow the star lights to stand out, while darker walls can create a dramatic, cozy effect with warm white lights.
Styling Tips to Enhance Your Star Christmas Tree
Elevate your Star Christmas Tree with these expert styling tips to create a polished, professional look. These ideas will help you maximize the visual impact of your glowing design while keeping it cohesive with your home’s aesthetic:
- Night Sky Backdrop: Hang a deep blue or silver curtain behind the wall art tree for a starry night glow. It amps up the star lights’ twinkle, perfect for modern or cosmic vibes.
- Minimalist Holiday Decor: Pair the tree with understated decorations like silver garlands, white stockings, or tiny moon ornaments. These elements complement the tree’s modern aesthetic without overwhelming its delicate design. Consider adding a woven basket beneath the tree to hold gifts or star-shaped decor.
- Wall Color Choice: Light walls (white, cream) highlight the star lights. On bold walls, use cool white or multicolor lights for contrast and wall art impact.
- Ground the Design with Gifts: Place a few beautifully wrapped presents in silver or navy wrapping paper beneath the tree to anchor the display. Add ribbon bows or star-shaped tags for a cohesive, festive look that ties the design together.
- Add Subtle Metallic Accents: Incorporate gold or silver elements, such as metallic ribbon, tinsel, or small ornaments, to enhance the tree’s sparkle. These accents catch the light and add a touch of glamour without overpowering the minimalist aesthetic.
- Layer with Textured Elements: Introduce texture by draping a lightweight wool or cotton throw near the tree or adding a plush rug below. Textured elements create warmth and balance the sleekness of the LED lights, making the space feel inviting.
- Incorporate Scented Elements: Place a holiday-scented candle (pine, cinnamon, or vanilla) or a small diffuser near the tree to engage multiple senses. The combination of soft lighting and festive fragrance creates a fully immersive holiday experience.
- Experiment with Light Colors: While warm white lights create a cozy vibe, consider multicolor star lights for a playful look or cool white for a sleek, modern feel. Some LED sets offer color-changing options, allowing you to switch up the mood throughout the season.
DIY Christmas Trees: Stylish, Personal, and Unique
I hope this guide inspires you to create a personalized DIY Star Christmas Tree that glows with creativity and warmth. It’s an artistic, space-saving, and elegant way to celebrate the season without the clutter of a full tree.
Whether you’re decorating a tiny apartment, a chic office, or just looking for a new holiday tradition, this DIY design lets you celebrate with starry flair. Let your home twinkle this Christmas!


